
FDM vs SLA: Which 3D Printing Process Fits Your Part?
By admin
Choose the 3D printing process by working backward from what the part has to do. A wall-mounted sensor bracket needs a reliable fit and room for a fastener. A miniature needs clean facial details and fine edges that survive finishing. A soft gripper prototype depends heavily on the material. The best comparison uses the same job, a representative sample and the complete workflow from setup to finishing.
What each process does
Fused deposition modelling, or FDM, pushes a thermoplastic filament through a heated nozzle. The machine follows successive paths to build the outside walls, internal infill and any support structures. Orientation affects where lines and layer boundaries fall. The same design can behave differently when the dominant load changes direction relative to its layers.
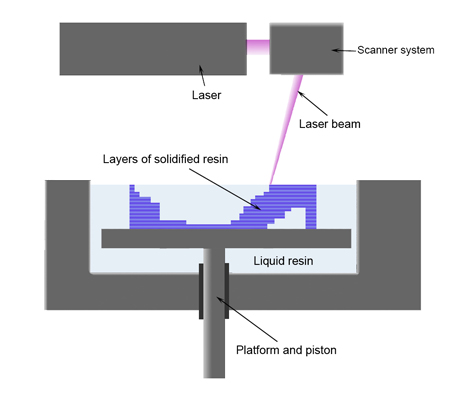
Laser stereolithography, or SLA, solidifies selected areas of a liquid resin with light. Desktop resin printers also use other exposure methods, including MSLA with a masked light source and DLP with a projected pattern. These machines share a vat-photopolymerisation workflow, with differences in exposure, speed and how printed details are resolved.
Compare the parts you actually need
| Decision | FDM filament | SLA resin |
|---|---|---|
| Good starting jobs | Fit checks, brackets, housings and larger prototypes. | Miniatures, smooth masters and small intricate features. |
| Surface finish | Extrusion lines are usually visible. Orientation and support placement matter. | Often finer detail and smoother surfaces, with marks where supports attach. |
| Post-processing | Remove supports and clean up the surface as needed. | Wash and follow the resin’s support-removal and post-cure instructions. |
| Material questions | Check creep, heat resistance and the direction of expected loads. | Check toughness, service conditions and the required cure procedure. |
| Costs to count | Filament, support waste, machine hours and finishing time. | Resin, support waste, wear items, cleaning supplies and post-processing time. |
Design a fair comparison
- Pick the hardest feature. Sample the snap tab, threaded insert pocket or embossed lettering that makes the design challenging.
- Agree on a test. Use the actual mating part or a measuring tool. Decide in advance which measurements and surfaces matter.
- Use realistic settings. Start with each vendor’s material and printer profiles and orient each sample to make sense for that process.
- Finish both samples. Include support removal, washing or curing where needed. Compare the elapsed hands-on time and the usable result.
Handle resin as a workshop process
Plan a dedicated work area for the printer and post-processing. Follow the manufacturer’s safety data sheet and instructions for ventilation, protective equipment, spill cleanup and disposal. A print may carry uncured liquid on its surfaces when it comes off the machine. The required wash and cure depend on the material. Cleaning liquid can also pick up resin and should be handled according to the product instructions and local disposal rules.
Hollow resin models can reduce material use in suitable cases. Give drainage and cleaning access serious consideration during design. A sealed cavity can trap liquid and create trouble after the outside surface looks finished. Follow your resin printer’s design guidance before hollowing structural or enclosed shapes.
How to make the call
For a large iterative mock-up, try an FDM sample and test how quickly you can revise the fit. For a fine master or miniature, try a resin sample and inspect the detail after finishing. For a part that bears a substantial load, sees heat or contacts sensitive materials, check the supplier’s technical data and validate the actual printed part. Evaluate the material and manufacturing process together.
Write down the result as a repeatable specification. Include the machine, material, orientation, finishing steps and the measured features that passed. That record makes the next quote or reprint much easier to compare.
